Saturday, 20 April 2013

BA6 | Specialism #09


Asset #2 Stone Temple Pillars

Worryingly I am still not 100% sure of what my entire scene is going to be comprised of, not through lack of trying of course, I just cant seem to settle my mind on A - how it’s going to look overall i.e. where is the environment headed, towards a tomb? More jungle? And B - I cant seem to picture all the possible assets I have floating around in my head together in an environment.

Having said this I have settled on asset number 2 which are going to be a pair of large stone temple pillars. One of the ideas flying around in my imagination currently is that the environment I am building is leading up towards a jungle temple/tomb similar to that found in Uncharted or Tomb Raider. Again though I am still unsure D: -cries-
 
Visual Research and Inspiration/Influences

Going to start off as I always do with some visual research so that I have some reference images to work from for my model with the desired look I wish to achieve. As usual I will use a mixture of real life pillars and one created in 3D software so that I can get a better visualisation of what I want my pillars to look like. 


What Have I Learnt?

From the real life references I can see that the jungle ruin pillars tend to be made from a lighter coloured stone and that weathering and elemental effects have changed their appearance. For example a lot of the stone/rock has deep cracks and has become miss shaped. Nothing about their appearance is primitive which is good as I am trying to ensure all my models are organic. A lot of moss and plant life seems to entwine with the pillars too which I might look into incorporating if I have time. I will certainly ensure the moss is introduced when texturing.

Thursday, 18 April 2013

BA6 | Specialism #08


Jungle Rope Bridge | Part 2

A lot has happened since I last posted about my bridge. I have pretty much finished it now. There are a few areas I would like to work on, edit and take further but for now time is against me and I’m happy to call it 98% finished. The reason it has taken me longer than I had anticipated since my last post to finish? Well, I UV mapped the entire thing too which was a lot of pain. 


First of all I am going to talk about how I created some of the rope for the bridge. I used the CV curve tool to draw the control verts from the side view which would make up my curve. I would start at the origin of the rope and make it flow down towards the next rope tie. 

 
Id then select the main face which I wanted to be the rope, whether it was already a part of my rope ties or a fresh cylindrical polygon, and then select the curve I just created second. Then I would hit extrude and bump up the divisions until the curve was defined enough. 

 
Organic Modeling

One of the main tasks I set myself was to ensure my model was “organic”, this means no primitive shapes and basic polygons. I wanted the model to have character and charisma with a flare of style. Here are some examples of how my bridge is organic. 


As you can see, unlike 99% of the 3D rope bridges I looked at (which we admittedly low poly okay) my wooden posts which act as the main support for the bridge are entirely organic shapes. They aren't just polygon primitive cylinders. I have taken time to ensure that my wooden log supports are organic. The same goes for the wooden planks that make up the walk way of the bridge. Each of them are different based upon  my research from my visual references I posted previously. They were a great visual aid when designing each wooden planks. 

Un-Wrapping the UV’s

I am glad I started to do this as I modeled because I would have under estimated the amount of time it needed to unwrap this model. Luckily I think the bridge will be the biggest model I make so hopefully no more set backs like this. For starters I’m not 100 sure if the rope UV’s will work and they might need more tweaking before they show textures properly. I also still need to go back and assign similar UV’s to the same map to be more efficient. The main bulk of UV unwrapping is done though and I am happy with that. I forgot to take a screen cap of the entire model before I unwrapped it plus it wasn’t all finished when I started but here is an example of how some of the model looked before I unwrapped it myself.


…and here is the entire bridge unwrapped. You can really see the difference on the wooden planks.


One major problem I had to work around was the cylindrical mapping. As a lot of my models are organic in shape, it seemed that the cylindrical mapping wouldn’t always unwrap the model very well leaving me with crazy UV’s which gave me a headache to even just look at. 

 
No amount of unfolding or relaxing these UV’s helped and I literally have no idea why, there must be a logical reason but I was told by Lothar that cylindrical mapping *should* work and that this was weird. I got a bit worried about my model and how I had built it but was adamant that it was clean and therefore I carried on unwrapping a different way. I had to select faces that were all similar and use cylindrical map in separate segments on these long ropes/wooden posts. I would then sew the edges back up and adjust the UV’s until the checker pattern was as accurate as I could get it. 


Yes this took me four times as long as it would have done to just use the cylindrical mapping tool but the bonus I achieved from doing it this way was that I was learning and getting use to the UV layouts and tools which helped me immensely. The rinse and repeat process helped me remember and hopefully retain the techniques and tools needed to unwrap UV’s so technically NOT time lost :) 


Here is an example of how the long rope looked before ad after I had finished with it. I am proud that I got it looking that much better. Of course the UV is HUGE at this point and the checker pattern is really small ;) but the point is that the checker pattern is neat and square, no stretching.


Another issue I have encounters while unwrapping are seams. Obviously I need my rope textures to be seamless so that the plain, smooth, cylinders actually look like rope but I need the texture to seamlessly wrap around. There are areas where my UV’s have an ugly seam and no amount of tweaking would fix it or help.


Of course this is something I can go back to when I actually texture the bridge. There were other parts I seemed to reduce the obviousness of the seam so I can always try and re un wrap this and the other areas that need work.

The Final Outcome

So, after all that, here is the bridge. I am actually really proud of it and how it has turned out :D 

Thursday, 11 April 2013

BA6 | Specialism #07


Jungle Rope Bridge | Part 1

Now that I am becoming more confident in my ability in Maya I don’t find the need to document every little move that I make in a step by step guide because most of the progression elements are very basic to me now. 

This is not to say I haven't had any problems to overcome in the modeling of the bridge so far. I have been thinking about how to make the rope, do I create properly modeled rope with ridges and twist or do I simply create an extruded cylinder and ensure the rope texture applied is seamless and high quality? I decided that I would have a crack at modeling actual rope. I didn’t really know where to start so I went online to find help which is when I came across multiple tutorials, however a lot of them said they throw your polycount through the roof or are simply a pain to UV and texture. I came across a post on a forum with images of how to create some basic rope which I followed and worked quite well. Here is how I achieved the effect. 

First of all, I created a “nurb circle” with 12 control vertices (see under “sections” on the options menu on the left). 

 
Then I selected these specific vertices…

 
…and then I moved them all inwards to the center. The remaining control points around the edges just needed altering so that in the end I was left with a 3 leaf clover look. 


After this I selected the CV curve tool and drew a ring which is the path I wanted my rope to take. This was going to leave me with a ring of rope.

  
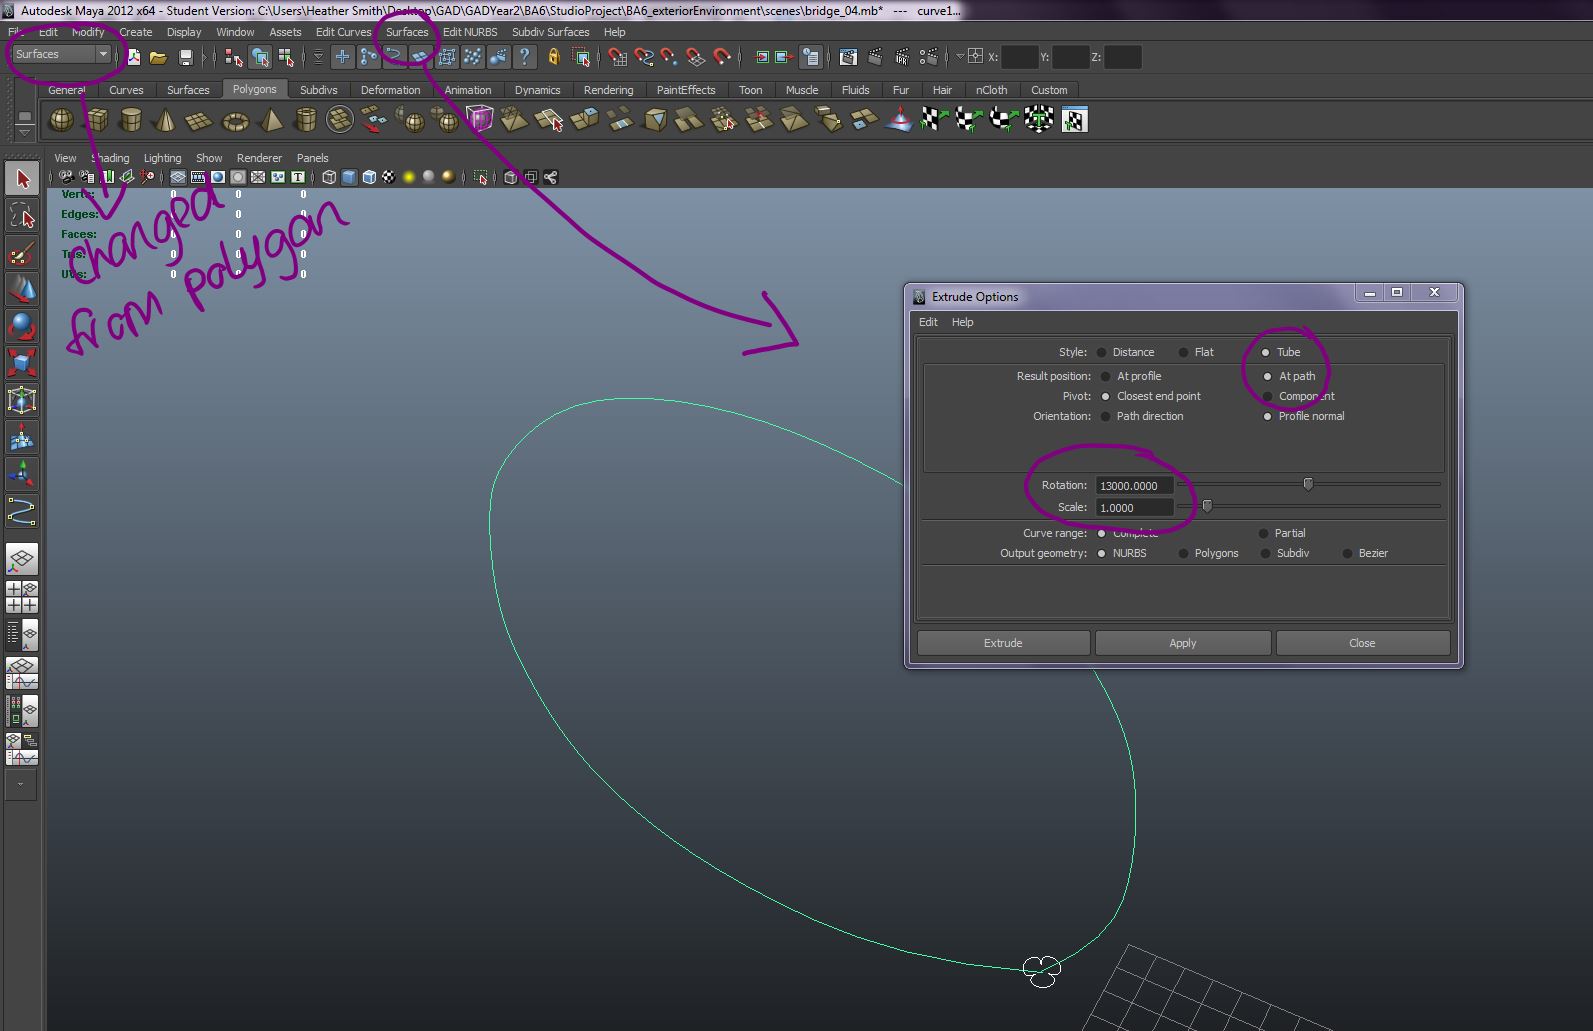
In order to add the twist to the nurb circle I created I needed to change my drop down shelf from polygons to surface > then select surface from the options at the top of Maya > drop down to extrude and select the option box > edit options like below. 


Once extruded I was left with this 3 tier twisted rope shape.

 
The only problem was the incredibly high poly count. For a basic loop shape rope (of which I would need to duplicate many times for my bridge design) it eats a large chunk of a poly budget. Even though I am not particularly worrying over a poly budget for this project I am still having to be reasonable and this just isn't suitable. Still, the point is that I made it and it was a success :D So, that’s the main thing ;)   
 
Rope Bridge WIP Renders

Okay so like I said previously, I haven’t kept step by step screenshots because this model has been fairly straight forward (in terms of my knowledge and lack of guide needed) to create. Following my design I have tried to ensure that the model is really organic. A lot of the visual influences I found used wooden posts which were simply basic polygon primitive spheres and cylinders to create the rope wrapped around them. I have used a similar method for the rope however my wooden posts have more of an organic shape to them instead of a simple “perfect” cylinder as this is a main focus for my project; creating organic models. 


Jack Eastoe showed me this really cool effect that you can achieve when you export your Maya model as an FBX into 3DS Max. It basically creates an almost cell shaded aesthetic and I thought it looked really awesome so I did it to my model too :’)

BA6 | Specialism #06


Asset #1 Wooden Jungle Bridge

I have been wanting to make a wooden bridge for a while now so I thought this would be a good time to do it. I am still not entirely sure on how the entire environment scene is going to look or what assets I want to create to put into it but I sure do want to make an organic rope bridge leading up to it so this is where it starts :D 

Firstly I must gather as much visual references as I can to ensure that the bridge is correct. I will use a mixture of visual references from both real life and models made in Maya so that I can get a better understanding for how the bridge can be built up in 3D space.


Designing the Bridge Based on Visual Influence Research

I decided that, as I felt inspired by separate parts of most of the bridges included in my visual research, I needed to do my own quick concept so that I could push the design through to Maya. I did a very quit and basic values sketch in Photoshop in order to sketch out the ideas I had floating around in my head design wise.