Friday 25 January 2013

BA5 Studio Project | Production #22


 Curtainssss!

I made some curtains following a helpful video by World of Level Design I posted at the beginning of the project. Here is a step by step guide for how I achieved them, I'm not sure if they will be game engine worthy but I think they look pretty :)

I used the create drop down menu to select the pencil curve tool and used my wacom tablet and pen to draw a curvy line which would make the shape of the curtains. 


I then  duplicated the curved line.  

 
I then had to change my shelf to surfaces and select surface > loft with both the curves selected (top and bottom of curtain).


Lofting then left me with the overall curtain shape that I needed but this is still pretty basic.

  
By adding subdivisions and selecting vertices separately I was able to mould the curtains into an organic shape. 

  
Once this was done I added a fairly low poly ring to the thinnest part of the curtain to look like a ring holding them open. I then simply grouped the curtain and ring > centred the pivot > ctrl D’d the curtains and put them in place on the other window. 

BA5 Studio Project | Production #21


Making the Window

I wanted to put a window behind the desk as a focal point in the room. I wanted the window to be fairly big and let in cracks of moonlight to emphasise the creepy atmosphere of the room. Here are some visual references of how I envision the windows to look. 


My Windows!

Some inserted edge loops, deleted edges, awkward bevels and hidden edges later I have windows :D (for now I have applied a dark high transparency blinn shader so that it looks darker outside and shows that they are windows). 

Inserting edge loops around the walls to create the shapes for the windows behind the desk.

  
This is actually my second attempt as my first one was deleted in an angry rage due to hidden edges for no apparent reason (well, probably due to me doing something stupid but I like to pretend they just came out of nowhere :P).  I knew I wanted a small extruded area to add small detail on the window but for some reason Maya just wouldn’t let  me extrude the faces together but separately (if that makes sense)…I even turned off “keep faces together” and it did nothing :/ 

SO! To get those faces I had to add in extra edge loops. I also added extra edge loops in where I wanted the detail on the window as you can see here. 

 
Firstly I extruded the outer edges of the window to create a window border that would be wooden or something I guess!


Then here you can see the extra detail I added in around the border of the window.

  
This is where I decided to add in a blinn shader. I made is transparent and also slightly darker to give a darker feel to the outside of the window.  


Final outcome, I am so happy with these windows :D  

BA5 Studio Project | Production #20


Project Update

Been a couple of days since I last posted anything so I felt that it was appropriate to post a project update complete with a “to-do” list, mainly for myself, so that I can keep a track on what exactly I need to do! 

So, I have built the majority of my museum study environment level (use ALL the words) and I am extremely happy with it! I mentioned in previous posts about the assets that I built that I needed to run them past Lothar, my tutor, to ensure they were game engine ready and he said they were fine! Mega happyyy :D 

This means I can show the progress of the whole room as there aren't any major changes or alterations I need to make! Here are some screen shots of the level as it stands currently…

 
As you can see here I have added some books to the shelf which I made really easily (ill post the screenshots next). However, my tutor Lothar has said that the better way to create small reusable assets like books (which can simply be re-sized and re used in different areas to save time and work) is to make one large one first, un-wrap the uv’s, texture it, THEN re-scale it (only smaller versions though so they fit on the UV map and don’t become distorted).  

Lothar asked my why an ammo box was in a study environment, to which I replied that it was supposed to be a wooden delivery box that could have contained an exhibition piece or something. I think I will have a go at tweaking this so that it looks more antique than ammo like :P 

 
Making the Books

So, the books. I simply used a primitive cube and shaped it into a generic book shape using bevels and extrudes. I then duplicated this shape multiple times.

  
I then selected each book and simply reshaped it… 


All I had to do then was rotate them and place them on the shelf in an realistic and organic way so that they looked realistic. 

  
What Now?

Last Thursday Lothar gave us a demonstration in unwrapping UV’s successfully. This was so helpful! I have made notes and will write them up soon, possibly when I start to unwrap the model I chose to do. The first thing I plan to do next though is: 

Finish my model. I want to add a window, curtains, door and some alcohol bottles as they link directly to the game. I might also add a med-bottle to the bookshelf as these serve as health in the game. 

Asses my models and see where I can cut down the poly count. 

Finalise my choice of model to texture. As my model consists of many assets I wont have time to texture them all properly and to the correct (highest) standards that Lothar has demonstrated to us. 

Unwrap the UV’s successfully on the model I do chose to texture. 

For now I will leave my to-do list as this because I don’t want to put tons of pressure on myself and feel rushed. Right now I am going to get cracking on the finishing touches to my model :)

Wednesday 23 January 2013

BA5 Studio Project | Production #19


Miscellaneous Assets #09 - #12 - Photo Frame, Lamp, Vase & Open Book

These are assets that I created “freestyle”. I didn’t really have any reference material so I modelled them from my head which I know is bad practice but I already know imp not texturing this whole scene so I plan to just fill it up at least. Before it looked a bit empty but I think these small miscellaneous assets add a bit of character and bring the scene to life. 

Asset #09 - Desk Lamp

Here is a very basic, low poly model of a lamp which would be adding mood lighting to the scene (and possible light for the character and altering gameplay, refer to game design document). I have kept the sub-divisions as low as possible without losing the circular shape that I need for the lamp stand and shade. I have re used the trick that I think many modelers use for lamps in games where you just don’t actually see the bulb…although ironically I was playing some Left 4 Dead a night or so ago and I actually saw the inside of the lampshade and there was detail! D: nooooo haha :P I will have to ask my tutor tomorrow if this is an acceptable form of “short cut” for design. 

  
Asset #10 - Open Book

Here is another asset I made for the desk so that it didn’t look too empty, it is an open book. In terms of gameplay this could be used by the player in order to find a note or diary entry (again, refer to design document). The book itself is only a singular piece of low poly geometry so it couldn’t be animated to open as there are no separate pages; its all one piece. However this could be textured to appear like a book and the player wouldn’t think twice about it.

  
Asset #11 - Vase Ornament

This is simply a low poly ornament that could be scale dup (slightly) and used anywhere. I have used it on top of the desk to add more depth to the scene environment. It is low poly.  

 
Asset #12 - Photo Frame

This is here because it is a direct tie in with the gameplay. The player can find various family related photographs around the museum reminding them of past life events disguised as repressed memories. Here is an example of a photo frame in which the player could find one of these family photographs.

BA5 Studio Project | Production #18


Asset #08 - Glass Display Cabinet

I have decided my scene needed more assets which linked it to a museum so I have chosen to model another display cabinet. I wanted to pick on which was more intricately detailed compared to the other one I have. Here are the visual references I gathered to help. 


I was so frustrated whilst building this model that I completely forgot to screen capture my progress which is annoying because there was quite a few problems I had to solve along the way :/ For example, the top section of the cabinet looked like it was going to HAVE to be a separate piece of geometry but me being my adamant self, I was determined to try and make the top connect somehow. After many added edge loops I was able to merge vertices and create a model that was all one piece. This will probably come back to bite me but I feel like I accomplished something y’know?  I am fairly sure my tutor will find something broken with it though :( (The square in the middle is actually hollow so a museum display could be put inside once a glass/see through texture was applied to the glass case!)  

Monday 21 January 2013

BA5 Studio Project | Production #17


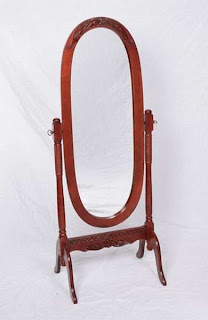
Asset #07 - Floor Mirror

In Distorted Delirium there is a heavy focus on the use of mirrors to enable the player to physically see the mental status of the main character Lianna. There is a boss room where her Father (in monster form) creates a habitat full of mirrors (refer to design document for metaphorical reasons for this). That is why I thought it might be a nice addition to have an old floor mirror in the study, it’s a really nice tie in with the game design document. Here are some visual references for the type of mirror I want to create. 


Using the CV Curve Tool

I had to figure out a way to create the delicate and organic leg shape for the mirror whilst maintaining a low (ish) poly count and also ensuring my geometry was clean. I am not sure if CV curves work within game engines, this is something I need to ask my tutor, however for the purpose of this build I was able to use the CV curve tool and extrude along it to ensure the legs had an organic shape. To do this I had to select the CV curve tool (under create) and draw a curve using points. Once this was done I was able to duplicate and rotate the curves so that there was one in place wherever I needed legs. 

 
Once I had the curves in position I was able to select the face which I wanted to become the actual leg itself. With the selected, I then had to also highlight the curve to ensure the extruded face knew where I wanted it to go. 

  
Once this is done you simply have to press the extrude button and the face will become extruded along the curve…only it will look like this.

 
It does this because the new shape is only subdivided by 1. To alter this I had to go into the attributes menu on the right and bump up the sub divisions. As I did this, the shape began to form properly and the curve was created. I could also alter the taper on the legs so that they got thinner at the tips making the mirror look more ornate and delicate. 

  
I simply repeated this step for each of the mirror legs until I was left with this… 

 
Final Outcome

Totally happy with how this turned out! I am fearful for the polycount and also whether the mesh is considered “messy” because the bottom detail is a little crowded but I had to use bevels in order to keep a smooth shape and add detail. Again this will need to be passed by Lothar but I am so happy with this model that I wont mind if he says I need to change it haha :P