Asset #6 - Victorian Style Desk Chair
The next asset for my study environment scene I am going
to work on is the desk chair which will be placed in front of the desk
strangely ;) The designs I am looking at currently look intricate and I am
fearful that I might not be able to maintain low poly modeling for the chair. I
will have a go anyway and post up the results and go from there.
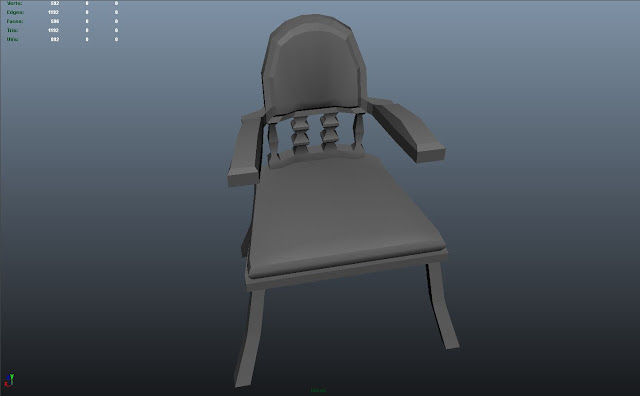
Okay so I have now built the chair, well, I have built an incredibly basic version of this chair which isn’t identical but will do :P I did have a few problems to overcome and my original fears of it being too high poly are indeed true, I feel this chair would be, as Lothar says, “expensive” to run in game. I will have t show him, the good news is I would only have to figure out how to create a “dumbed down” version, as opposed to adding more detail.
The key design areas I took from the reference image
were:
The cushioned top area of the chair for
back support.
The cushion on the actual seat part.
The angle at which the legs come out of
the chair.
The short, high arm rests.
The spokes at the back of the chair.
Trying to Fix the Strange Shadow :/
In order to create the pattern at the back of the chair
I needed to create “holes “ in my mesh. My first idea was to use the INSERT EDGE LOOP tool to “cut” the
back of the chair up so that I could DELETE FACES and then APPEND TO POLYGON the holes that I had
left.
However, as you can see, every time I deleted a face and
filled up the holes using the append to polygon tool I was left with this
strange shadow on the top section of the chair. After numerous forum searches
and a few panic attacks fearing I had duplicated faces and incorrect edges I
decided this definitely wasn’t the “proper” way to build the shape I wanted.
Attempt #2 - Using Extrude and Merge
Vertices
This was my next port of call, and I am ashamed that I
didn’t try to do this first but hey, better late than never right? :P I SELECTED THE FACE I
WANTED TO DELETE on
both sides of the chair. I then SELECTED EXTRUDE and hit the “R” KEY to bring up the SCALE TOOL. From here I was able
to PUSH THE
SELECTED FACES INWARD TOWARDS EACH OTHE. When they were really close together I DELETED THE FACES and then RIGHT CLICKED
VERTICIES which
meant I was able to go to EDIT MESH > MERGE VERTICIES and merge the two
sides together so that I was left with a gap but also the edges were filled. HOORAY, SUCCESS :D
Creating the (not so) Intricate Chair
“Bars”
As you can see in my reference image the chair has
intricately detailed bars at the back which form a part of the back support. I
knew from the start I couldn’t do anything overly fancy due to poly limitations
and general Maya knowledge but by adding MULITPLE EDGE LOOPS around each of the
middle bars, I was able to use the MANIPULATION TOOLS to pull, pinch and
resize the bards to add detail to them which helps them stay true to the
reference image.
Creating Definition Between the Chair
and Cushion
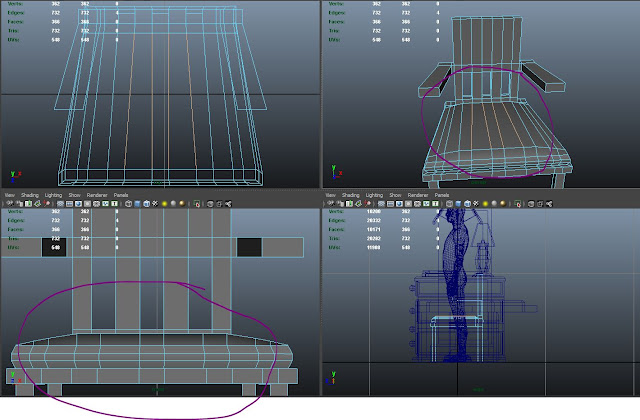
In order for the cushion to be built upon I first had to
use a BEVEL to differentiate
between the cushion ad the wooden area of the chair.
Making The Padded Cushions
In order to get the plum volume in the cushions, to make
that padded effect, I needed to play around with the EDGES and VERTECIES. I would SELECT THEM and then PULL THEM UP to create the bump
effect needed for the cushion. I would then DESLECT THE OUTER EDGES and CONTINUE TO RAISE THEM until I was left with
the centre edges which I would pull the highest. This created a smooth rise
which appeared like a cushion.
The Final Outcome
I am really happy with the way this chair turned out. Of course you don't have to be blind to see it isnt exactly the same in anway way but that image I posted was only a reference. Plus this excercise is fo rme to gain knowledge of Maya and problem solving which I did. I feel more confident everyday I deal with this programme. I know I am only at the basics but confidence is where it starts right? :P I still need to show my tutor this model as I fear it might be just too higher poly count to be considered effective for game engine. Even if I do have to produce a new model I wont be frustrated! :)


No comments:
Post a Comment